

AROS Installation GuideAbstract This manual will guide you through the necessary steps for installing different AROS flavors. Warning AROS is alpha quality software. This means that it is currently mostly fun to play with and cool to develop for. If you came here because you thought AROS was a finished, complete and fully usable operating system, you will most likely be disappointed. AROS isn't there yet, but we're slowly moving in the right direction. Contents DownloadingAs AROS is currently under heavy development, no new stable snapshots are currently available. The snapshots that are still available are obsolete and don't reflect the current status of AROS. The users are encouraged to download the nightly builds instead. Nightly builds are done, as the name implies, automatically every night directly from the Git repository and contain the latest code. However, they have not been tested in any way and can be horribly broken, extremely buggy and should you be very unlucky, they might even destroy your system. Most of the time they work fine, though. Please see the download page for more information on nightly builds available and how to download them. Installation of AROS/linux-i386 and AROS/linux-x86-64RequirementsTo run AROS/linux-i386 or AROS/linux-x86-64 you will need the following:
That's it. ExtractingSince AROS/linux-i386 and AROS/linux-x86-64 are hosted flavors of AROS, installation is simple. Just get the appropriate archives for your platform from the download page and extract them where you want them: > tar -vxjf AROS-<version>-<platform>-<cpu>-system.tar.bz2 If you downloaded the contrib archive, you may want to extract it too: > tar -vxjf AROS-<version>-pc-<cpu>-contrib.tar.bz2 RunningAfter having extracted all files you can launch AROS like this: > cd AROS > boot/linux/AROSBootstrap [options] [kernel arguments] Options:
-m <size>          allocate <size> Megabytes of memory for AROS
                   (default is 64MB)
-c <file>          read configuration from <file>
                   (default is boot/linux/AROSBootstrap.conf)
--memsize <size>   same as '-m <size>'
--config <file>    same as '-c'
Kernel arguments: mungwall enables memory checks --fullscreen runs AROS in fullscreen mode (only X11) If you want to run AROS under libsdl instead of X11 you have to swap the files Storage/Monitors/SDL* with Devs/Monitors/X11*. Installation of AROS/pc-i386 and AROS/pc-x86_64RequirementsNote AROS can be installed to a hard drive, and its installer won't remove or wipe any partitions if not asked to do so. However, note that it's always unwise to install an operating system on a working machine whose HD contains valuable data. We'd advise you to make a backup of your data beforehand (always a good thing to do), and we cannot take responsibility for damage that occurs. Any bug reports on the installation process will however be appreciated. You will need a PCI-based PC-AT (based on i486 or later) with PS/2 or USB mouse, PS/2, AT or USB keyboard, IDE hard disk and CD-ROM on parallel ATA or SATA configured in legacy mode, and an (S)VGA video card and monitor. At least 24 MB of RAM is required. A VESA-compliant VGA card is recommended. There are generic 2D-accelerated drivers (HIDDs) for some ATI and nVidia cards. Also, most PC-compatible emulators/VMs (virtual machines) can be used. QEMU, VMware (Server/Workstation/Fusion), VirtualBox, Bochs and MS VPC are known to work. AROS has drivers for several different network cards. Further details are available in the FAQ. If you want to try sound on AROS, the best choice at this moment is Creative 10k-based sound cards. The x86-64 port has similar requirements, except of course that a 64-bit capable Intel/AMD CPU is needed. Chipset support is currently limited. BIOS SettingsAROS relies on the BIOS to do some hardware configuration that other operating systems handle by themselves. Because of this, the BIOS settings are more important when using AROS. Listed below are some of the common BIOS options that affect AROS, and advice on how to set them.
In most cases, the BIOS options selected for AROS will also be compatible with other OSs on your computer. However, changing the SATA mode may require you to change some settings in these other OSs or even reinstall them. Installing from CD-ROMThe recommended installation media for AROS/pc-i386 and AROS/pc-x86_64 is CD-ROM, since the whole system fits on a single disc (and also all the contributed software). Simply download the ISO image from the download page (we recommend using a download manager able to resume broken downloads, like wget) and burn it to the CD using your favorite CD burning program. There are a number of freeware CD burning programs for any system. We can point Windows users to the InfraRecorder - it's free, small and fast, and it's just simple. Other examples are CDBurnerXP, DeepBurn, and AstroBurn. In the Linux world there are k3B, Brasero and others. On Amiga (and AROS) you can use FryingPan. The easiest way to boot from the AROS installation CD is if you have a computer that supports booting from CD-ROM. This might require additional changes in the BIOS set-up, though, to enable booting from CD-ROM, as it is quite often disabled by default. Once the computer is set to boot from CD-ROM, simply insert the CD into the first CD-ROM drive and reboot the computer. The boot is fully automatic, and if everything works you should see a nice screen after a little while. If your computer does not support booting directly from CD-ROM, you can create a boot floppy and use it together with the CD-ROM. Simply insert both the boot floppy and the CD into their respective drives and reboot. AROS will start booting from the floppy, but after the most important things have been loaded (including the CD-ROM file system handler) it will continue booting from the CD-ROM. Installing from FloppyThese days floppies can be found useful only to boot if your PC's BIOS doesn't support booting from CD or on some really obsolete PCs. But it's still maintained. To create the boot floppy, you will need to download the disk image from the download page, extract the archive, and write the boot image to a floppy disk. If you are using a Unix-like operating system (such as Linux or FreeBSD), you can do this with the following command: > cd AROS-<version>-pc-i386-boot-floppy > dd if=aros.bin of=/dev/fd0 If you are using Windows, you will need to get rawrite to write the image to a floppy. Please see the documentation of rawrite for information on how to use it. There's also an GUI version called rawwritewin. To boot simply insert the boot floppy into the drive and reboot the computer. The boot is fully automatic, and if everything works you should see a nice screen after a while. Installing to hard driveNote that you have been warned that AROS is still in development. Though harddisk installation is well-developed by now; there is still a chance that it may corrupt existing partitions. If you want to be as safe as possible, install AROS on its own harddisk. Other options would be: Making a full backup beforehand, using a PC which does not contain anything you can't live without, or use a virtual machine. Getting readyFirst, set up your HD - either real or a virtual drive image - for use. For a real drive, this may involve plugging it into the machine (always a good start) and setting it up in the BIOS. For a virtualizer's or emulator's virtual drive, you probably just need to select an option to create a new drive image, and set it as one of the virtual PC's boot devices (the CD drive must be the first boot device during installation of AROS however). The following options are depending on what you want to do. Installing AROS OnlyThe most simple situation is that of installing AROS alone on the whole disk, either a new one or one with some unneeded data on it. You might also use an additional HDD for AROS. Currently the installation is meant to be made by means of the InstallAROS program, which is located in the Tools drawer on your BootCD. Please, launch it by clicking on its icon. Once it's launched, it'll show you the greeting screen. 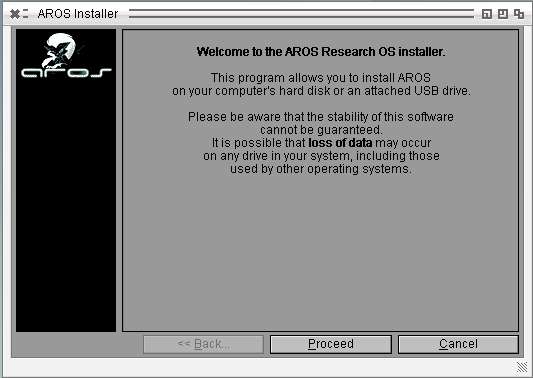
Then click the Proceed button in the installer to get a screen with installing options. 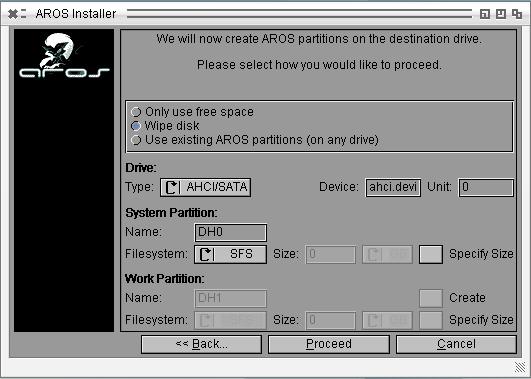
You can see the current installing device (ahci.device) and its unit (0), which is your first HDD. If you intend to install on additional disk, please, change this number. To find out the number, you can use Tools/HDToolbox utility. Check the option Only use free space if you want to keep current partitions as they are, or select Wipe disk to erase existing data on the hard drive. You can set the size of new AROS partition if you wish, and add an extra WORK partition to install programs on it. After you click the Proceed button again, InstallAROS will create the partition or partitions, and after that it will ask you to reboot. 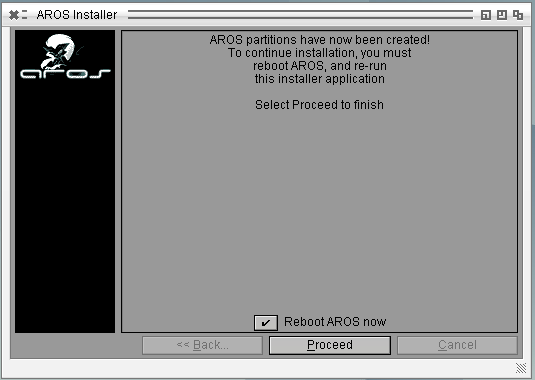
After the reboot, please start InstallAROS again. 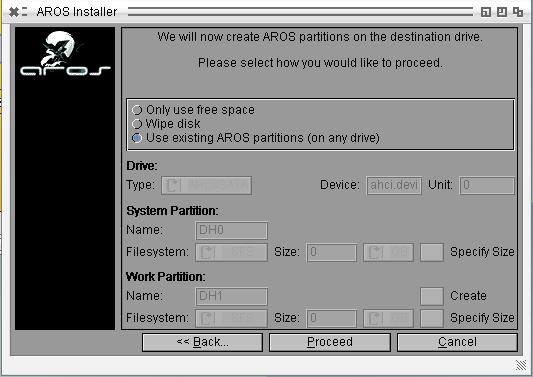
This time, the option Use existing AROS partitions should be selected. Proceed with this. You will see some extra options in a window. 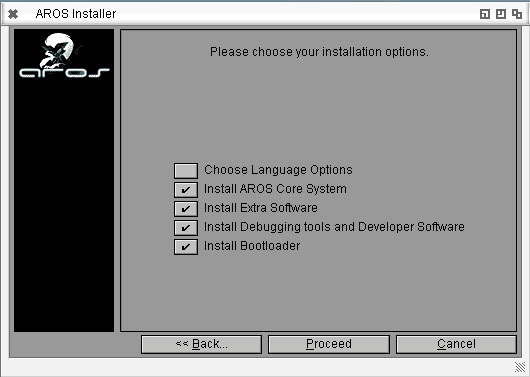
Make your choice and click the Proceed button. On the next installer screen you can choose which partitions you want to format and copy files to, and whether a WORK partition is used and whether files should be copied to it. 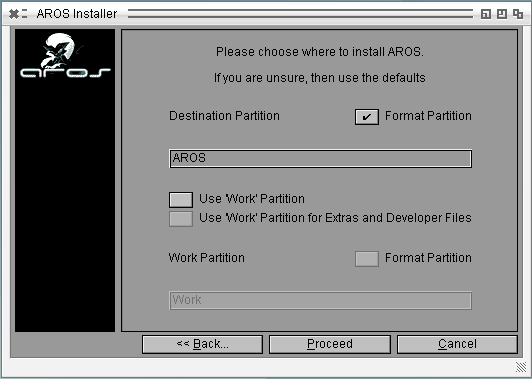
After you made your choices and proceed, the installer will show the GRUB installation device and the path to the GRUB files for you to check. 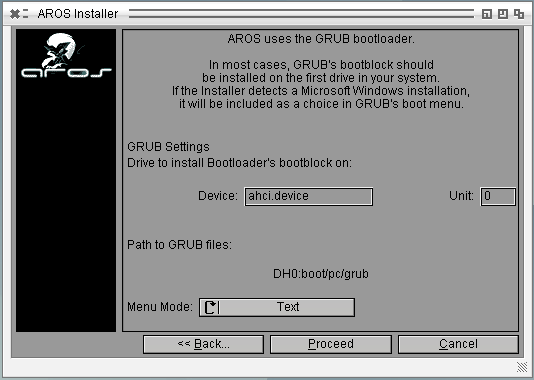
Proceeding, you will see the last screen before installation, which will warn you that formatting isn't reversible. 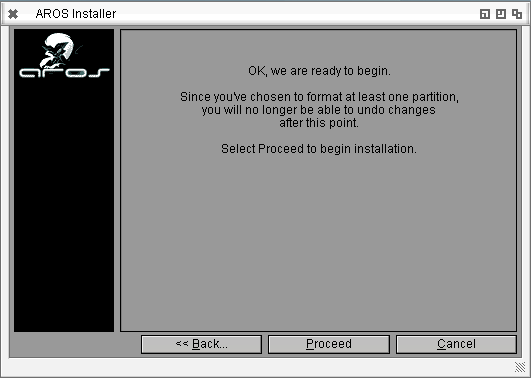
After clicking Proceed one last time, you should see the installer doing its work. You may be asked to select your keyboard type and locale settings, then the files are being copied. This may take a while; be patient, please. 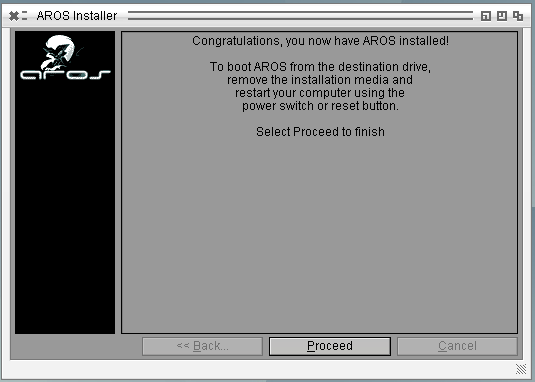
After the installation is finished, you can remove the AROS Live CD from the CD-ROM drive and reboot into your newly-installed AROS system. Installing AROS along with Windows(R)/DOS(R)Installing AROS along with Windows should be an easy task (assuming you use Windows XP). Generally, you'll just need to follow the installer prompts as shown above to make this working. The installer is designed to automatically detect your Windows installation and put it in the GRUB menu. Check the chapter above about standalone AROS installation for the details of the procedure. If you ever need to restore the previous NT loader, you can use the fixmbr command in the recovery console from your Windows installation CD. There can be problems with some older and newer Windows versions (like 95/98 and Vista). For installing over Vista you can use steps, similar to the ones for Linux with GRUB installer. In cases where Grub should be installed and used to boot Vista, you'd just need to add a menu entry to your /boot/grub/menu.lst: title Windows Vista root (hd0,0) makeactive chainloader +1 If you prefer to use the Vista bootloader, there are programs like EasyBCD to manage its behavior. TO-DO more... Installing AROS along with Linux/BSDInstalling AROS along with Linux or BSD systems is almost the same as doing so for Windows. You'll need to create free space for AROS with available tools. Then use InstallAROS to do the partitioning and formatting of the AROS partition and copy the system on to it. (You can use additional WORK partition if you want to.) It's better, however, not to install the bootloader (uncheck the corresponding checkbox): [ ] Install Bootloader After the installer has finished copying the files, it will ask you to reboot. After the reboot you'll need to boot your Linux/BSD again, to set up the bootloader. AROS uses a patched GRUB bootloader, able to load a kernel from AFFS. But you don't have to use it, if you put AROS kernel in the location of your system kernel is - usually /boot - and use a conventional GRUB from your distribution. Just copy /boot/aros-i386.gz from AROS LiveCD to /boot. Then put some new lines to the end of your /boot/grub/menu.lst file to include an AROS menu entry: title AROS VBE 640x480 16bpp root (hd0,0) kernel /boot/aros-pc-i386.gz vesa=640x480x16 ATA=32bit floppy=disabled quiet boot You can change the kernel's parameters to set the screen resolution. The 'floppy=disabled' option disables the floppy trackdisk device, as this device is not too useful these days but can cause troubles in some cases. If you happen to use lilo or any other bootloader, this trick won't be that easy. (It's hard to make lilo booting AROS kernel.) You will need to somehow chain load AROS GRUB and set it to start up a kernel. After the reboot, you should be able to see an AROS entry in the GRUB menu and to boot AROS. Installing AROS along with other systemsA lot of other operating systems exist on the platforms AROS supports. If your system uses GRUB bootloader the process should be fairly similar to the one for Linux. If not, please remember that all you need for AROS to boot is just to place its files on a partition where GRUB can find it and boot the kernel. TO-DO more... |
Copyright © 1995-2025, The AROS Development Team. All rights reserved.
Amiga® is a trademark of Amiga Inc. All other trademarks belong to their respective owners. |


